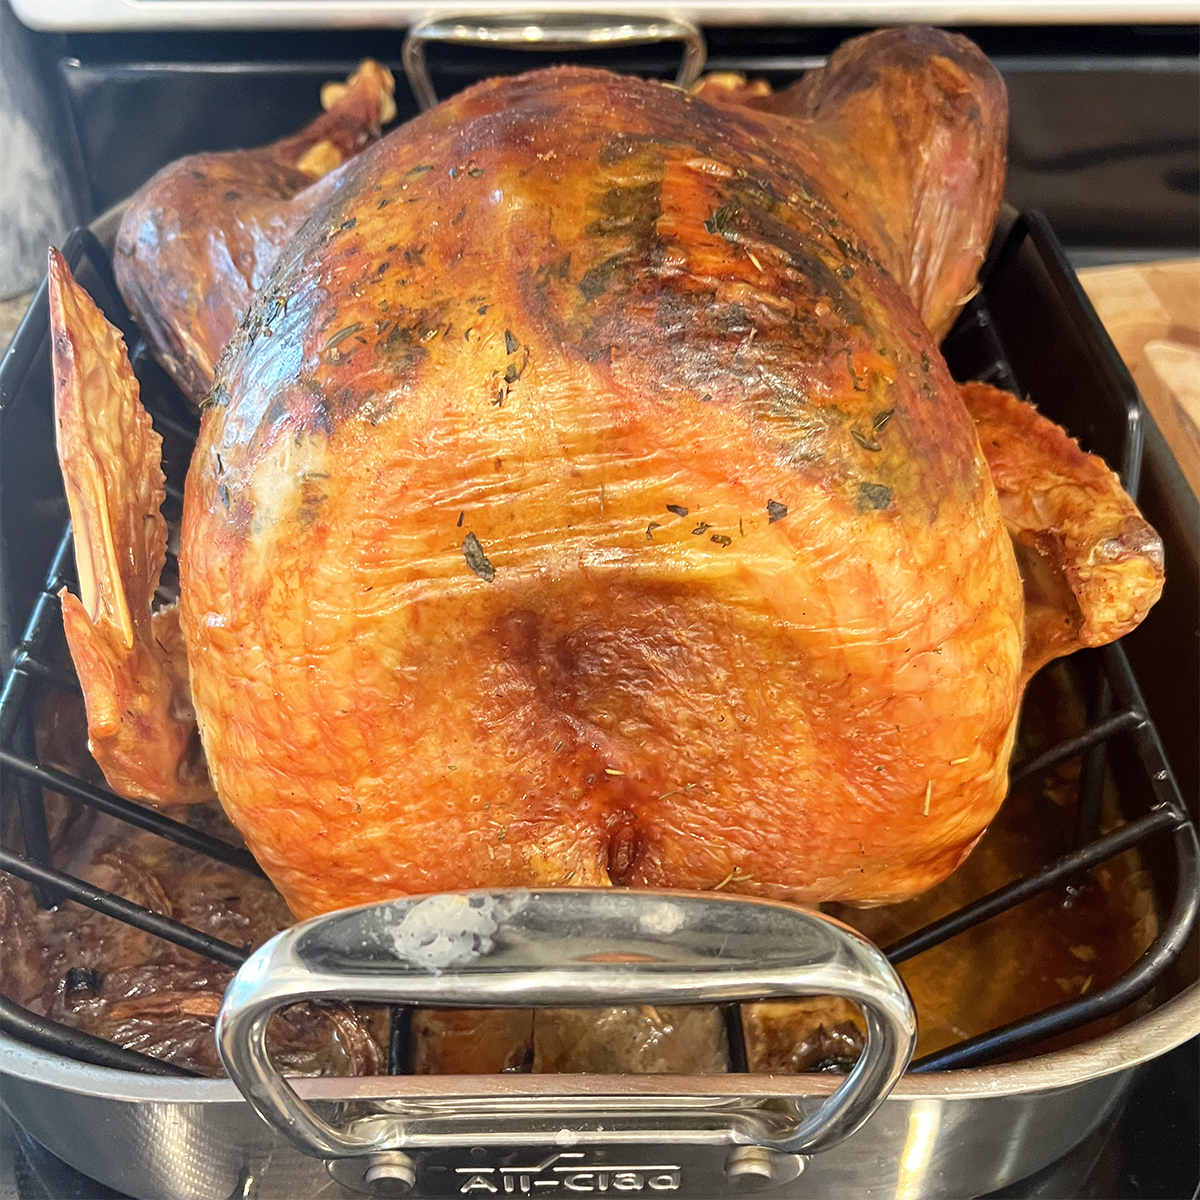
This step-by-step guide to roasting a Thanksgiving turkey will give your bird main character energy on the big day.

Ah, the Thanksgiving turkey—golden brown, juicy, and flavorful. Thanksgiving dinner just isn't the same without it. A well-done turkey can be the star of the show, but if you've never cooked a whole bird before, it can seem intimidating. Have no fear! With some simple prep, you can have a perfect Thanksgiving turkey on your holiday table with crisp, herby skin, melt-in-your-mouth juicy meat, and leftovers that feel like a treat. Whether it’s your first time tackling this bird or you’re a seasoned turkey roaster looking for new tips, this will guide you through the best way to cook a whole turkey in the oven to achieve show-stopping results. Let’s get started!
The Perfect Turkey
When done right, roasted turkey has:
- Crispy skin: Golden and crackly with a buttery herb crust.
- Moist and flavorful meat: Tender white meat and juicy dark meat infused with the savory richness of garlic, herbs, and a hint of citrus.
- Delicious drippings: These are liquid gold for making the most flavorful gravy.
My absolute favorite roast turkey recipe is this coffee bean turkey with sweet onion gravy, but if that's not what you're going for this year, make it your own. Simply follow the step-by-step guide below for the best Thanksgiving turkey recipe.
Ingredients
Here’s everything you need to make the best Thanksgiving turkey:
Turkey:
- Turkey (12–15 pounds): Fresh or frozen (don't forget to thaw!). Avoid“self-basting” turkeys injected with sodium and chemicals. You'll want about one pound of turkey for each person, plus enough for leftovers. If you're feeding a big crowd, I suggest getting two smaller (12-14 pound) turkeys rather than one big bird, for better flavor and shorter roasting times. Make sure you remove the neck and bag of giblets!
- Dry brine: Mix 5 tablespoons of kosher salt, 2 teaspoons ground coriander, 2 teaspoons brown sugar, 1 ½ teaspoons ground black pepper, 1 ½ teaspoons dried thyme, and ½ teaspoons baking powder together.
- Wet brine: 1 gallon (16 cups) water, 8 cups apple cider, 1 ¼ cups kosher salt.
Herb butter rub:
- Unsalted butter: Makes the skin crispy and flavorful.
- Fresh herbs: Chopped finely for aromatic magic.
- Garlic: Adds depth to the flavor.
- Lemon zest: Brightens the flavors and cuts through the richness.
- Kosher salt and pepper: Essential seasoning.
For the cavity and roasting:
- Onion: Adds sweet, savory notes from inside the bird.
- Lemon: Infuses the turkey with a citrusy aroma.
- Apple: Balances the savory flavors with a subtle sweetness.
- Fresh rosemary and thyme sprigs: Amplifies the herbaceous aroma.
- Chicken broth or turkey broth: Keeps the turkey moist during roasting.
- Melted butter: For the cheesecloth robe (optional). To enhance browning and flavor.
How to Make the Perfect Oven-Roasted Turkey
This is a step-by-step guide on how to make an oven-roasted Thanksgiving turkey. See the recipe card below for detailed ingredients and instructions.
1. Thaw the turkey
The process of cooking a turkey actually starts days before Thanksgiving. Hopefully, your turkey has already been ordered. If not, make sure to pick it up at least three or four days ahead so it has time to thaw in the refrigerator. If you bought a frozen turkey, store it in your freezer until the week before Thanksgiving. Set an alarm or reminder that will pop up on your phone so you don’t forget! Nothing like realizing your turkey is frozen solid on Thanksgiving morning. The USDA recommends 24 hours to thaw in the refrigerator for every four pounds of turkey. Keep the turkey in its original packaging and set it inside a roasting pan or on a sheet pan to catch any liquid as it thaws on the lowest shelf in your refrigerator. For a 12-14 pound turkey, allow 3 days to fully thaw.
2. Brine the turkey
While optional, brining is an important step in making a juicy turkey with crispy skin. Brining essentially means you're covering it or soaking the turkey in a concentrated salt solution. In addition to helping with moisture retention (the salt in the brine breaks down some of the turkey's proteins, effectively tenderizing the meat), it also helps with flavor, seasoning the meat from within, and preventing a bland, blah bird.
For turkey, I always go with a dry brine because it’s less messy and easier to store. The most important ingredient here is salt. I use kosher salt—you want about a teaspoon of salt per pound. Add a little bit of baking powder (which helps with browning) and add spices. You can season it up however you want (onion powder, garlic powder, paprika, turmeric for color, and black pepper are classic), but make sure the spices don't add up to more than half the amount of salt. you're using. For example, if you have a 12-lb turkey, use 12 teaspoons (4 tablespoons) of salt, and not more than 6 teaspoons (2 tablespoons) of other spices. Too many spices will make it hard for the salt to penetrate the turkey skin.
- Before you brine: Remove the thawed turkey from its packaging. Take out the giblets and neck (usually in the cavity). Also, remove the "built-in thermometer"—they're never very accurate. Don't rinse the turkey—that will just spread germs all over your kitchen sink—simply pat it dry with paper towels. Pro tip: A dry turkey equals crispy skin, so don’t skip this step!
- For a dry brine (my recommended method!): Pat the turkey dry with paper towels. Start by seasoning the inside of the turkey cavity and put the dry brine mix all over the turkey—be generous and get in every single crevice, spread open the wings, and get behind the wings. As it hangs out in the refrigerator, it will form a concentrated brine and then get drawn into the meat, allowing the salt to render the fat and break down some of the protein so your turkey doesn't get dry and tough. Place it on a wire rack on top of a sheet pan uncovered in the refrigerator for a couple of days (at least 24 hours, up to two days).
- For a wet brine: In a large bucket, place a brining bag and fold the edges over the side. Mix the 1 ¼ cups of kosher salt with 8 cups of apple cider and 16 cups (1 gallon) of cold water until it dissolves. Add the turkey and brine for at least 12 hours.
4. Make the herb butter
The herbed compound butter not only adds delicious flavor to the turkey, it also helps the meat retain moisture and creates a crispy, golden skin. The added herbs and spices give you a chance to flavor the turkey.
- In a small bowl, mix softened butter, minced garlic, chopped herbs, lemon zest, salt, and pepper.
- Pro tip: You can make this compound butter a few days before, wrap it in plastic wrap, and bring it to room temperature when you're ready to butter your turkey!
5. Season the turkey
Remove the turkey one hour before roasting. If you're using a wet brine, discard the turkey brine when you're ready to cook the turkey and pat the turkey dry again.
- Loosen the skin: Gently slide your hand under the turkey skin (breast side) to separate it from the meat.
- Spread the herb butter: Rub the butter mixture generously under the skin (specifically the breast meat, since that tends to get drier) and all over the outside of the bird. Don’t be shy—it’s the key to crispy skin!
6. Stuff the cavity
Please please please don't put the bread stuffing inside the turkey. One, that's kind of gross. Two, it's just going to suck all the moisture out of the bird. Instead, fill the turkey cavity with the sliced onion, smashed cloves of a whole head of garlic, lemon, apple, and herb sprigs. This infuses the turkey with flavor and keeps it moist.
7. Truss the turkey
Trussing the turkey helps it maintain its classic Thanksgiving shape by bringing all the floppy bits in so they're tucked away nice and tight and lets the bird cook more evenly.
Using cotton kitchen twine, truss the turkey—this video is helpful if you've never done it before.
If this seems like too much, work, simply use the twine to tie the legs together and tuck the wing tips under the body. Move your oven rack to the lowest position. Depending on the size of your turkey, you may need to remove extra racks to give the turkey room.
Preheat your oven to 450ºF (232°C). I like to start my turkey at a higher oven temperature and then bring it down as it roasts. Spread butter on the bottom of a large roasting pan, and place the turkey breast side up in the pan or on top of a roasting rack. Scatter onions around the bottom of the roasting pan and pour the broth into the bottom of the pan.
8. Roast like a pro
For a whole turkey, I like to start my oven at 450ºF (232°C) to crisp up the skin and then reduce the heat to 350ºF (177°C) to continue cooking until the bird is done.
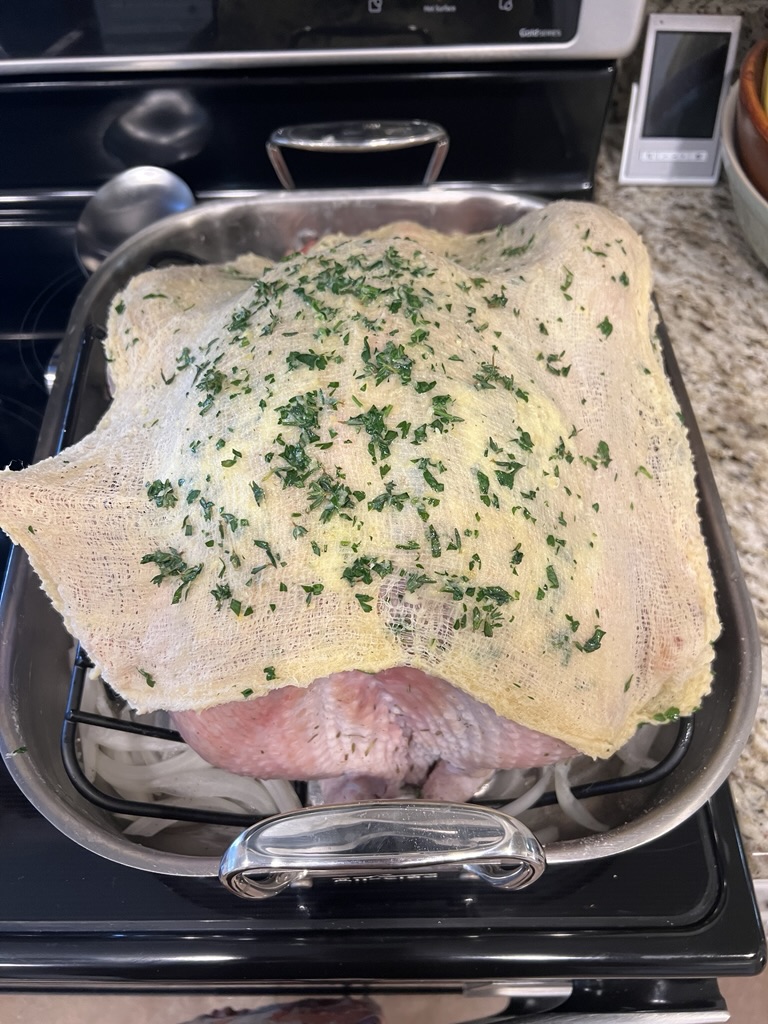
- Cover the turkey. My go-to method is a butter-drenched cheesecloth robe, or you can tent the turkey with aluminum foil. I've also heard that oven bags work wonders, but I haven't tried this method myself.
- Cheesecloth robe: Leave the cheesecloth double-layered. Dampen the cheesecloth with warm water and then squeeze out the excess water. Submerge the cheesecloth in melted butter. Drape the buttered cheesecloth on top of the turkey and then drizzle with any remaining melted butter.
- Foil tent: Cover the turkey loosely with foil. Crimp the foil along the pan so it's not directly touching the turkey—don't smoosh the foil onto the turkey. Uncover the turkey for the last 15 minutes to get it nice and brown.
- Total cooking time: Make sure to roast the turkey until the internal temperature reaches 165°F (74°C) in the thickest part of the thigh meat. Plan for about 15 minutes per pound for an unstuffed turkey. For a 15-lb turkey, plan for 3 hours and 45 minutes, plus at least 30 minutes for resting.
- Baste occasionally: If you’re feeling ambitious, brush the turkey with melted butter every 30 minutes to keep it moist (honestly though, if I'm draping the turkey with cheesecloth, I'll skip this step.
- Pro tip: Use an instant-read thermometer to avoid overcooking. Make sure you're inserting the thermometer into the thickest part of the meat. Be careful that you're not hitting the bone or going so far into the breast that you're hitting the cavity because then you'll get an incorrect reading.
9. Rest before carving
Once the meat thermometer reads 165ºF in the turkey thigh, transfer the bird to a cutting board, and let the turkey rest for 30 minutes. DON'T tent the cooked bird with foil, because it can just trap steam and soften the crispy skin. The residual heat will finish cooking the turkey (the temperature can continue to rise by about 10 degrees while it rests) and this resting time also locks in the juiciness, giving it time to redistribute the juices and allowing the muscle fibers to relax. And, as long as the turkey is intact (read: you haven't carved it yet), it will stay warm for more than an hour, so you can go about finishing your other Thanksgiving tasks (like the gravy!).
10. Make the turkey gravy
Skim about half a cup of fat off the top of your turkey drippings (top it up with butter if you don't have enough). Add ½ cup of Wondra flour (all-purpose flour is fine if you don't have Wondra). Add seasonings and stir it together with a whisk until the flour is nice and brown (almost the color of peanut butter). Then take 3-4 cups of liquid (you can use turkey drippings, chicken broth, or turkey broth) add a little bit at a time, and whisk until smooth after each addition. When you have the right consistency, let it boil for 1 minute. Season it with a little bit of salt and pepper, taste your gravy, and add more seasonings to taste.
11. Carve and plate the bird
If you want to present the turkey whole, bring it out to the table for a show and tell, but then go back to the kitchen to carve and plate it. Trying to carve a turkey at the dinner table is a disaster (I speak from experience). Grab a big cutting board (bonus if it has a rim around it to catch any remaining juices), and a very sharp knife. To carve your bird:
- First, cut off any twine you used to truss the bird and remove any herbs, onions, lemons, or apples you placed in the cavity of the turkey.
- Next, take the legs off. Find the gap between the leg and the breast. Cut through that skin and gently pull the leg away from the breast. Find the joint (never cut through the bone) and position your knife between where the two bones meet so it cuts through the joint. Set the leg and thigh aside and repeat on the other side.
- Take the wings off. Find the natural line where the wing meets the breast and cut perpendicular to the wing bone. Pull the wing gently to pop the joint, which will expose where to cut. Remove the wing, set aside, and repeat on the other wing.
- Then remove the turkey breasts. There's a bone that runs right down the middle. Start by placing your knife straight up and down along the bone and cut it on either side of the bone, then gently angle your knife to follow the ribs. After making the top cut, flip your knife perpendicular to the bird and cut along the bottom, freeing the breast from the bone. Ideally, you want each breast to come off in a single piece. Set aside and repeat on the other breast.
- Set the carcass aside and save it for some delicious turkey broth.
- Start with the leg and thigh, cut along the drumstick, and pull apart until you can see the joint and slice, repeating on the other leg. If you have people who like dark meat, cut the thigh bone out of the meat and put it with the carcass. Slice the thighs into sections and repeat on the other thigh. Next, separate the drummette and the flat. Slice the breasts into ½-inch pieces against the grain, keeping the skin on as much as possible. Plate the whole thing and garnish with herbs.
Need more direction? This video from NYT Cooking is a great visual.
Frequently asked questions
Yes! Roast the turkey in advance, carve it, and store the meat with a bit of broth to keep it moist. Reheat in a dish covered with foil at 325°F until warmed through.
Look for a fresh, organic, or free-range turkey between 10 and 15 lbs for the best flavor. Avoid“self-basting” turkeys injected with sodium and chemicals. If using frozen, make sure to thaw it properly.
If you're entertaining a smaller crowd and cooking for 2-4 people, you might want to consider roasting a turkey breast instead of a full bird. It will take less time in the oven (between 90 minutes and 2 hours), requires less prep, and takes up less space in your oven. Make sure to brine it before you cook it!
The herb butter, cavity aromatics, and broth in the pan work together to lock in moisture. And the cheesecloth robe or foil tent also helps immensely. Resting the turkey after roasting is also crucial.
It typically takes about 15 minutes per pound to cook a turkey at 325ºF, but keep in mind that cooking time varies, depending on how large your turkey is and whether it is stuffed or unstuffed. I recommend starting your oven at a high heat (450ºF / 232°C) to crisp up the skin and then reduce the heat to 350ºF (177°C) until it finishes cooking. Use an instant read thermometer to ensure the turkey reaches an internal temperature of 165°F (74°C) in the thickest part of the thigh.
Brining is optional but highly recommended for added juiciness. Use a wet brine (water, salt, and aromatics) for 12-24 hours, or a dry brine (salt and spices) for 24-48 hours before roasting.
Yes! The herb butter under the skin does the heavy lifting. But basting adds extra richness and color if you want to go the extra mile.
Since you've already carved the bird, simply put the meat in an airtight container and store it in the refrigerator. You can also shred any leftover meat and freeze it in a zip-top bag for future soups and stews. Don't forget to save the carcass for making turkey bone broth!
Too much turkey? Never! Make sure you have a plan for leftovers. I love making Thanksgiving leftover sliders or subbing chicken for turkey in this delicious pot pie soup.
Substitutions + Variations
- Out of fresh herbs? Use dried, but reduce the quantity to 1 teaspoon per herb.
- Prefer smoky flavors? Rub the turkey with smoked paprika along with the herb butter.
- Want a citrus kick? Add orange zest to the butter and swap the lemon for oranges.
Special diets
If you have a special diet you're adhering to, here are some ways you can adjust this recipe.
- Gluten free: Double-check your broth for hidden gluten.
- Dairy free: Use dairy-free butter or olive oil in place of the compound butter.
Related Recipes
Looking for some crowd-pleasing Thanksgiving side dishes to go with your turkey? Try these:
- Sweet Potato Soufflé
- Sautéed French Green Beans Almondine
- Classic Homemade Cranberry Sauce
- Roasted Beet and Goat Cheese Salad with Pistachios and Pomegranate
This Thanksgiving turkey isn’t just for holidays. Whip it up for a Sunday family dinner, a casual Friendsgiving, or meal prep it for turkey sandwiches all week long. It’s versatile, delicious, and destined to become your go-to recipe for every celebration. Happy Thanksgiving! 🦃
Before you go...
⭐️ If you make this oven-roasted turkey recipe and love it, please leave a comment and leave a five-star rating for this recipe! ⭐️
I love to hear from you and do my best to respond to each and every comment. And of course, don’t forget to tag me on Instagram — seeing your delicious creations is my favorite!
Print
Thanksgiving Turkey
Description
Here's how to make the juiciest, most moist Thanksgiving turkey, from beginning to end.
Ingredients
- 1 large 12-15 pound turkey
- 1 yellow onion, peeled and quartered
- 1 apple, quartered
- 1 lemon, halved
- Fresh rosemary and thyme sprigs
- 2 cups turkey broth or chicken broth
For the dry brine:
- 5 T kosher salt
- 2 t ground coriander
- 2 t brown sugar
- 1 ½ t ground black pepper
- 1 ½ t dried thyme
- ½ t baking powder
For the compound butter:
- 2 sticks (1 cup) unsalted butter at room temp, divided
- 2 T fresh sage, plus 12 leaves
- 2 T fresh thyme
- 3 T fresh parsley
- Zest of 1 lemon
- 3 t kosher salt
- 1 ½ t black pepper
For the turkey gravy:
- ½ cup turkey fat (or butter)
- ½ cup Wondra flour
- 3-4 cups turkey drippings (or turkey or chicken stock)
Instructions
- Thaw the turkey in the refrigerator (24 hours for every 4 lbs of turkey).
- Dry brine the turkey. Remove the giblets and neck and pat the bird dry with paper towels. Mix together the dry brine ingredients and generously season the turkey inside the cavity and all over the skin. Place the turkey on a wire rack on top of a sheet pan and let sit, uncovered in the refrigerator, for 24 to 48 hours.
- Remove turkey 1 hour before roasting. Pat the bird dry and allow it to come to room temp.
- In a medium bowl, combine softened butter, sage, thyme, parsley, lemon zest, salt and pepper.
- Preheat the oven to 450°F and position a rack in the lower third. Place the turkey in a roasting pan. Season the cavity and fill it with aromatics.
- Truss the bird or tie the legs together with twine and fold the wing tips under the bird.
- Lift the skin and rub 4 tablespoons of butter under the skin of the bird, spreading 4 tablespoons of butter on top of the skin.
- Take the remaining 8 tablespoons of butter and melt it. Dampen the cheesecloth with warm water and squeeze to remove excess water. Submerge cheesecloth in butter until it has soaked up the butter. Lay cheesecloth over the top of the turkey and drizzle the remaining butter over the cheesecloth.
- After 45 mins, turn the oven to 350°F. Roast until turkey thigh registers 165ºF on a meat thermometer. Baste turkey with drippings 2-3 times throughout roasting and rotate the pan.
- Remove the turkey from the oven and let it rest for at least 30 minutes, uncovered.
- Make the turkey gravy by skimming half a cup of fat off the top of the turkey drippings and add ½ cup of Wondra flour in a large saucepan. Add desired seasonings and whisk together, cooking until the flour is the color of peanut butter. Then take 3-4 cups of liquid (you can use turkey drippings, chicken broth, or turkey broth) add a little bit at a time, and whisk until smooth after each addition. When you have the right consistency, let it boil for 1 minute. Season it with a little bit of salt and pepper, taste your gravy, and add more seasonings to taste.
- Carve the turkey and plate it. Bon appetit!
One more thing!
This recipe is a part of my Thanksgiving collection — check it out!


Share Your Thoughts